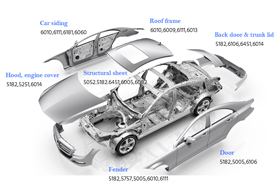
Many aluminum parts are not "impossible to make"—the real issue is that after ramp-up, their strength, fatigue performance, or consistency is not stable enough. The value of the Aluminum Forging Process is to upgrade a part from being merely "formable" to being controlled, repeatable, and built for long-term service.
If your part meets any of the conditions below, aluminum forging should typically be prioritized as a candidate process:
- Load-Bearing / Fatigue-Sensitive: critical components under long-term cyclic loading with a clearly defined load path
- High Lightweighting Pressure: weight reduction is required without sacrificing reliability or service life
- High Failure Cost: strict safety requirements, mission-critical duty, or harsh operating conditions
- Machining Is Not Cost-Effective: high material removal and scrap, and it is difficult to control batch consistency
Next, we will start with a decision chart of Part Size/Complexity × Annual Volume to narrow down the process from many possibilities to a small set of realistic candidates.
Then, we will use the temperature windows of cold forging, warm forging, and hot forging to explain why the same route can deliver very different results under different alloys and takt times.
Panoramic View of Aluminum Forging Methods: How Part Characteristics Determine Process Selection
A Decision Chart: Quickly Lock in the Right Forging Method by Size/Complexity and Production Volume
This chart uses two key inputs to help you quickly narrow forging methods down to a small set of candidate processes:
- X-axis: Part Size and Geometric Complexity (Large & Simple → Small & Complex)
- Y-axis: Annual Volume and Repeatability (Low Volume → High Volume)
How to use it is straightforward: first estimate where your part falls on the chart, then treat the processes in the corresponding quadrant as your priority evaluation routes.
The chart's purpose is to eliminate obviously unsuitable options first.
The final solution still needs confirmation based on the alloy and temper, structural details, and quality requirements.

Please note: it cannot replace an engineering review, but it enables process selection to start with a clear, structured convergence.
Click to Jump to the Relevant Process
Open-Die Forging: Large Preforms and Shaft/Flange-Type Parts
Open-Die Forging is formed on open dies through multiple forging passes (such as upsetting, drawing out, and piercing & hole expansion).
It is primarily used to convert large stock into a base preform with more reliable microstructure, more controllable machining allowance, and better readiness for downstream machining, rather than producing a complex final geometry in a single hit.
It is best suited for large-size, relatively simple geometries, low-volume production with frequent part changeovers, or as a preforming starting point for ring rolling, closed-die forging, and precision machining.
Process evaluation typically focuses on three key points:
- Overall forging ratio is often referenced as Y ≥ 5 as a guideline for microstructure improvement (subject to drawing requirements and applicable standards).
- Upsetting stability is commonly controlled by the empirical rule H ≤ 2.5D.
- For deep-hole piercing and expansion, the height allowance is commonly +10%–20% (to be verified against the forming path).
Closed-Die Forging: Complex Small-to-Medium Structural Components
Closed-Die Forging forms a heated billet by pressing it into upper and lower die cavities, using either a hammer or a press to produce a near-net-shape forging.
Excess metal flows out along the parting line to form flash, which is removed by trimming afterward.
This method is well suited for parts with relatively complex structures and higher requirements for strength and batch-to-batch consistency (such as control arms, brackets, housings, and flanges).
Compared with bar stock machining, it typically delivers more stable property consistency and lower material waste.
To run closed-die forging consistently, shop-floor control usually focuses on the following:
- Pre-forging → finish-forging takt: allocate material first, then complete detail fill
- Billet volume and distribution: too little leads to underfill; too much increases flash, raises forming load, and accelerates die wear
- Stable temperature + lubrication: too cold increases cracking risk; overly hot conditions and lubrication variation can cause die sticking and surface galling/tearing
- Flash gutter design + trimmability: affects material flow, cavity filling path, and die life
In terms of equipment, two common routes are forging hammers and forging presses (with different loading speeds and control characteristics).
The right choice should be evaluated against drawing-critical requirements, alloy/temper, and production cadence.
For details, see: [Aluminum Die Forgings].

Precision Forging: Bringing Forgings Closer to Finished Dimensions
Precision Forging refers to using higher-accuracy tooling and stricter process control to produce forgings closer to near-net shape (Near-net Shape), thereby reducing downstream machining allowance.
In most projects, precision forging is typically achieved through Precision Die Forging.
It is better suited for components with higher consistency requirements—such as gears/splines, impellers, and complex load-bearing parts.
Key Evaluation Focus and Control Points
- Preforming → Finish Forging → Sizing/Calibration: whether volume allocation follows a "get the bulk in place first, then fill the details" logic, avoiding uncontrolled final-stage over-forcing
- Flash vs. Flashless Routes and Venting: the filling path, venting, and parting control largely determine dimensional stability and surface quality
- Friction and Thermal Control Consistency: whether lubrication, transfer takt, and die thermal state are repeatable—otherwise "precision" is difficult to stabilize in mass production
When a part has dense features, stable volume demand, or the current route suffers from large material removal and obvious waste, the value of Precision Forging is typically more pronounced.

Seamless Rolled Ring Forging: Seamless Forging for Ring Components
Seamless Rolled Ring Forging is a dedicated process for producing seamless forged rings.
A typical route is to upset an aluminum billet, then pierce it to create a ring preform, and finally roll it on a mandrel with driven rolls to expand the diameter while reducing the wall thickness—achieving the target inner diameter, outer diameter, and wall thickness.
Key process evaluation points: whether ring rolling can be "run stably" typically comes down to three factors:
- Ring preform sizing and material distribution: The match among preform height, wall thickness, and pierce diameter determines whether metal flow remains stable during expansion, avoiding local instability and wall-thickness drift.
- Temperature and takt stability: Keeping the critical deformation stages within the temperature window directly affects flow behavior, surface quality, and dimensional consistency.
- Pass schedule and wall-thickness control: The combination of expansion amount, wall reduction, and number of passes determines wall uniformity, roundness, and how quickly dimensions converge.
Common applications include flange rings, gear rings / bearing rings, pressure-vessel end rings, and ring components for wind power and power transmission systems.
In real projects, whether ring rolling can be implemented consistently is primarily determined by ring preform sizing/distribution, temperature stability, and wall-thickness/pass control.
For details, see: [Aluminum Alloy Rolled Rings]

Cold Forging: Small Parts in High Volume Production
Cold Forging is a volumetric forming process performed at room temperature or near-room temperature (including upsetting, extrusion, and sizing/coining).
It is best suited for small-size, high-volume parts that require tight dimensional consistency (such as 1xxx/3xxx cold-forged heat sinks, bushings, and connectors).
Its value is not primarily about making shapes "more complex," but about delivering more economical and stable improvements in consistency, material utilization, and reduced post-machining.
Key process control points:
- Material and temper: alloy selection and supply temper determine the achievable deformation; when needed, use step-forming and/or intermediate annealing
- Load control + lubrication: whether forming load is controllable and lubrication is stable directly affects underfill, die sticking/galling, surface tearing, and dimensional drift
- Die life: the ability to maintain dimensional stability across the target batch size
When parts are "small and high-volume," and material ductility, lubrication, and die life are controllable, cold forging is often an efficient route to improve consistency and reduce total manufacturing cost.
Conversely, when those constraints cannot be controlled, projects more commonly shift to warm forging or hot forging, where the process window is wider.
For details, see: [ Aluminum Cold Forging]

Other Process Options
In some projects, in addition to open-die forging, closed-die forging, precision forging, seamless rolled ring forging, and cold forging, the following mature processes may be used as complementary options.
Common objectives include reducing the impact of temperature drop, improving local die fill, or increasing the preparation efficiency for long-shaft preforms.
Isothermal Forging
By controlling die temperature and heat exchange during forming, Isothermal Forging reduces flow instability caused by temperature fluctuation.
It is suitable for parts that require higher microstructure consistency, reliable filling of thin ribs and fine details, or more uniform deformation (with higher demands on equipment capability and process control).
Radial / Rotary Forging
Radial / Rotary Forging applies multi-directional radial loading to extend and reduce diameter for bar, shaft, or tube preforms.
It is commonly used for stepped shafts and long-shaft preform preparation, improving fiber flow orientation.
It can also serve as a preform route before subsequent closed-die forging or machining.
Forge–Extrusion Combination Forming
Forge–Extrusion Combination integrates closed-die forging with directional-flow steps such as forward extrusion and backward extrusion.
It is used to form and control near-net shaping of structures like deep cavities, local thin walls, and splines / tooth profiles.
In many cases, it helps improve material utilization and the consistency of cavity filling in critical zones.
If your part is difficult to choose between multiple forging methods, an efficient approach is to use drawing features (size/complexity), alloy and temper, annual volume, and tolerance targets to narrow the solution to one or two most probable routes, while listing the key risks that must be validated.
Below, three typical process routes will be used as examples to help you quickly understand how different choices lead to different delivery paths.
Process Route Overview: Three Typical Routes to Quickly Understand "How Delivery Works"
Different forging methods ultimately translate into an executable manufacturing route.
Below are three of the most common routes to help you build an intuitive understanding of delivery paths (details can be expanded on the corresponding process pages).
Route 1: Closed-Die Forged Structural Parts (Control Arms / Brackets / Housings)
Cutting → Heating → Pre-Forging → Finish Forging → Trimming / Flash Removal → Heat Treatment → (Straightening / Sizing) → NDT / Inspection → Machining

Key Control Points
Preform volume distribution: determines whether finish forging can fill the cavity consistently, directly affecting risks of underfill, laps/folds, and local overload.
Finish-forging temperature and transfer takt: determines crack risk and surface consistency; takt variation can turn a "within-window process" into "local loss of control."
Route 2: Open-Die Forged Large Parts / Preforms (Large Flanges / Stepped Shafts / Large-Section Connectors)
Cutting → Heating → Multi-Pass Open-Die Forging (Upsetting / Drawing Out / Piercing & Hole Expansion, etc.) → (Preformed blank) → Heat Treatment → NDT / Inspection → Machining to Size

Key Control Points
Overall forging ratio and deformation completion: the core objective is microstructure improvement and densification, establishing the baseline for downstream machining and in-service reliability.
Temperature uniformity and process stability: large-section parts are more sensitive to "core-to-surface temperature gradients" and local cooling, which can cause forming and microstructure variation within the same part.
Route 3: Seamless Rolled Rings (Gear Rings / Flange Rings / Bearing Rings)
Upsetting → Piercing → Initial Ring Preform → Ring Rolling Expansion (Wall-Thickness Control / Height Control) → Roundness Correction / Sizing → Heat Treatment → NDT / Inspection → Machining

Key Control Points
- Ring preform sizing and pass schedule design: determines wall-thickness uniformity, roundness stability, and material utilization.
- Temperature and rolling-state consistency: thermal gradients, takt variation, or equipment-state fluctuation can amplify forming non-uniformity and surface differences.
Choosing the right route is only the first step.
Whether mass production can stay stable often depends on whether the actual temperature at critical forming stages can remain within a usable window over the long term.
In the next section, we will start from the temperature routes of cold forging, warm forging, and hot forging—explaining how to interpret and verify temperature windows, and why they directly affect lead time and consistency.
Temperature and Process Window for Aluminum Alloy Forging
Temperature is not "just a parameter" in aluminum forging—it is the process boundary that determines whether forming remains stable, defects stay controllable, and mass production stays consistent.
Especially in Closed-Die Forging and Precision Die Forging, where metal flow requirements are higher, success or failure is often driven less by the furnace setpoint and more by whether the billet's actual temperature at finish forging still remains within the forgeable window.
Cold / Warm / Hot Forging: How to Choose a More Stable Temperature Route

Cold Forging
Room-temperature / near-room-temperature volumetric forming.
It is typically prioritized for small parts in high volume that demand tight consistency (e.g., 1xxx cold-forged heat sinks).
If 6xxx/7xxx/2xxx are used in cold forging, the process usually requires a soft, formable condition (e.g., O temper) plus multi-pass or multi-station step forming.
Thin walls, deep cavities, complex cross-sections, and large parts are generally not preferred for this route.
For cold forging, the decision hinges on three factors: whether the forming load is controllable, whether lubrication is stable, and whether die life is acceptable.
For details, see our [Aluminum Cold Forging Process] page.
Warm Forging
A route between cold and hot forging: the temperature is above room temperature, but clearly below the recrystallization temperature.
Its value is to reduce forming load and improve forming stability while achieving better surface quality and dimensional control—thereby reducing downstream correction and finishing.
For temperature-sensitive high-strength alloys, warm forging places greater emphasis on "window control."
Research indicates that 7075 can achieve significantly improved formability in a warm-forming range of approximately 140–220°C.
As temperature continues to rise, microstructural changes may occur and properties may be affected; the actual window must be validated against the alloy condition and the specific process.
Hot Forging
Hot forging trades temperature for ductility and flow capability.
It is better suited for large deformation, complex structures, deep cavities with thin ribs, large parts, and high-strength alloy projects.
It is generally easier to stabilize cavity filling and reduce risks such as underfill, laps/folds, and cracking.
The mass-production key is not "the hotter the better," but keeping the finish-forging temperature stably within the usable window—and stabilizing both the transfer takt and the die thermal state.
The typical trade-offs are more visible oxidation, lower dimensional accuracy than cold/warm forging, and the need for trimming, heat treatment, and a reasonable machining allowance.
Why Forging Temperature Should Be Defined as a "Window," Not a Fixed Temperature
Forging temperature is more reliably defined as a usable temperature window, rather than locking onto a single fixed value:
- Start Forging Temperature: the entry point at which the billet can smoothly enter effective plastic deformation.
- Finish Forging Temperature: the lower limit that must be protected during the final critical deformation stage, directly affecting die fill, cracking, and microstructure stability.
Temperature window: the usable interval from start forging to finish forging.
The narrower the window, the higher the requirements for heating uniformity, transfer takt stability, die thermal state, and lubrication consistency.
Common Forging Temperature Ranges for Wrought Aluminum Alloys
| Alloy Grade | Start Forging Temperature (°C) | Finish Forging Temperature (°C) | Temperature Range (°C) |
| 1100 | 405 | 315 | 90 |
| 2014 | 460 | 420 | 40 |
| 2025 | 450 | 420 | 30 |
| 2218 | 450 | 405 | 45 |
| 2219 | 470 | 427 | 43 |
| 2618 | 455 | 410 | 45 |
| 3003 | 405 | 315 | 90 |
| 4032 | 460 | 415 | 45 |
| 5083 | 460 | 405 | 55 |
| 6061 | 482 | 432 | 50 |
| 7010 | 440 | 370 | 70 |
| 7039 | 438 | 382 | 56 |
| 7049 | 440 | 360 | 80 |
| 7075 | 482 | 382 | 100 |
| 7079 | 455 | 405 | 50 |
A narrower window (approximately 30–45°C) is more sensitive to process fluctuation. Even a slight drift in finish forging temperature can trigger underfill, laps/folds, or edge cracking. This requires tightly linked control of finish temperature, takt time, die thermal balance, and lubrication consistency.
A wider window (approximately 50–100°C) provides higher shop-floor tolerance and is generally easier to stabilize in mass production. However, the finish-temperature lower limit and temperature uniformity must still be protected to avoid surface and quality risks associated with excessively high temperatures.
Alloy selection determines not only strength, but also manufacturing controllability. For complex parts or tight-lead-time projects, the forging temperature window often directly impacts total cost and delivery risk.
Temperature Is Not a Single Variable: Strain Rate and Lubrication Can Redefine Forming Difficulty
Within the same temperature window, forging outcomes are often determined jointly by three factors: temperature, strain rate (deformation speed), and lubrication / friction.
Strain Rate (Deformation Speed)
Faster deformation (harder strikes / more aggressive loading): locations with strain concentration—such as sharp corners, thin-rib roots, and abrupt wall-thickness transitions—become more sensitive, making edge cracking and micro-cracks more likely.
A stretched takt (slow transfer / frequent pauses causing temperature drop): it may look "more relaxed," but the billet temperature at the critical deformation stage is more likely to fall outside the window, increasing the risk of underfill and laps/folds due to insufficient filling.
Lubrication / Friction
- No lubrication: friction coefficient ≈ 0.48
- Effective lubrication: friction coefficient ≈ 0.06–0.24 (and it increases as pressure increases)
Note: results vary significantly with lubricant type, pressure level, and surface condition.
When friction is high, die filling becomes more difficult and forming load increases; the risks of die sticking and surface galling/tearing rise accordingly.
Overall, "too cold + overly aggressive deformation" tends to crack more easily, while "too hot + unstable lubrication" tends to increase die sticking and surface damage.
Even if the temperature appears to be within the window, non-uniform temperature distribution can still trigger local loss of control—such as localized underfill or localized cracking within the same die cavity.
Typical Defects Caused by Temperature Deviation
1. Finish Forging Too Cold (Near or Below the Lower Limit)
The most common issues are underfill / incomplete fill, typically appearing first at thin-rib tips, the bottom of deep cavities, and corner transitions.
When combined with strain-concentrated features such as sharp corners and thin-rib roots, edge cracking and micro-cracks become more likely.
A common trigger is that the actual temperature drops during forming—for example, due to slow transfer or locally cold dies causing localized cooling.
2. Too Hot or Excessive High-Temperature Dwell (Near the Upper Limit / Out of Window)
In the short term, filling may appear easier, but risks to surface quality and microstructure stability increase: stronger tendencies toward coarsening, poorer batch-to-batch consistency, and greater difficulty converging heat treatment results and machining allowances.
Temperature-sensitive high-strength alloys, in particular, should avoid prolonged exposure in high-temperature zones.
3. Non-Uniform Heating (Large Gradients / Unstable Thermal Distribution)
A typical pattern is "local loss of control within the same part": one side forms normally while the other side shows underfill/cracking or obvious surface differences; or batch stability becomes inconsistent.
In this situation, prioritize checking heating uniformity, transfer consistency, and die thermal state—rather than simply raising the overall temperature.
The core of temperature-related defects is whether the actual temperature during critical forming stages stays within the window, and whether thermal gradients and takt time remain controllable.
Temperature Window Validation: Making Trial Results "Repeatable" in Mass Production
Published forging temperature ranges are only directional guidance.
What truly determines yield and delivery stability is validating a process from "a single temperature point" into a repeatable temperature window (upper/lower limits), and defining the shop-floor conditions under which that window remains valid.
A typical approach to "map out" the window is:
- Define an initial temperature band: combine the alloy system with structurally sensitive zones (thin ribs, deep cavities, corners, etc.), and avoid relying only on a furnace setpoint.
- Run three-point trial forgings: cool-side—midpoint—hot-side to identify the defect "boundary," then converge the upper and lower limits through small-step adjustments (the cool side is more prone to underfill/cracking, while the hot side is more prone to surface issues and die sticking).
- Lock the window together with takt time: variation in transfer time, billet temperature gradient, and unstable die thermal state can all invalidate the window in mass production.
If you want to quickly judge whether a project is "easy to run and stable to scale," it is recommended to validate and freeze the temperature window + takt requirements already during sampling.
You can provide drawings, alloy/temper, and critical quality requirements—we will develop an executable window recommendation and a clear risk checklist based on trial results, and then drive delivery under the same control criteria.
At Which Stages Should You Engage Early to Make a Forging Project "Stable on the First Run"?
The challenge in forging projects is often not whether a part can be made, but whether the key constraints are clarified early enough.
By front-loading reviews at several critical checkpoints, you can typically reduce rework and trial iterations, and make downstream delivery more stable.
1. Before the Drawing Is Frozen: Complete a DFM Review First
While the drawing is still adjustable, align the items that most often trigger forming instability: thin ribs / deep cavities / sharp corners, abrupt thickness transitions, draft and parting-line strategy, fiber-flow direction in critical load paths, and the setup of machining allowances and datums.
Small changes at this stage are usually far more time-efficient than late-stage die rework and manufacturing rework.
2. During Sampling: Validate the "Temperature Window + Shop-Floor Takt Conditions"
The sampling stage is not only about "meeting dimensions."
The more critical task is to validate a repeatable temperature window and simultaneously confirm whether shop-floor conditions—such as transfer takt, heating uniformity, and die thermal state—can be held stable.
Only when the window and its enabling conditions are clear can trial results be reliably replicated in mass production.
3. During Volume Delivery: Control Variation Using a Consistent Standard
Once volume delivery begins, the focus shifts to "stable output."
Changes in raw material batches, capacity/takt adjustments, or drawing-detail revisions all require a clear evaluation and verification standard to avoid "same drawing, different parts" variation.
If your part involves thin ribs/deep cavities, critical load requirements, tight tolerances, or a compressed delivery cadence, it is recommended to compile the drawing, alloy/temper, and key quality requirements before the drawing is finalized, complete an upfront review of the process route and temperature window, and then proceed to sampling under that aligned control basis.
Evaluate Your Aluminum Forging Project
If you are evaluating an aluminum forging project and want to quickly confirm the right process route, whether the temperature window is controllable, and where the mass-production risks may be, we recommend sending an inquiry for an upfront technical review.
To improve communication efficiency, please provide as much of the following information as possible:
- Drawing / 3D model (key sections and tolerances)
- Alloy and temper
- Annual volume
- Target standards and inspection requirements (e.g., heat treatment, NDT, surface requirements)
- Critical loading conditions or assembly constraints
After submission, we will respond based on your inputs with: a recommended route (open-die forging, closed-die forging, seamless rolled ring forging, cold forging, etc.), key temperature-window focus points, and a prioritized risk checklist for validation.